TITANPARACORD.COM -
The
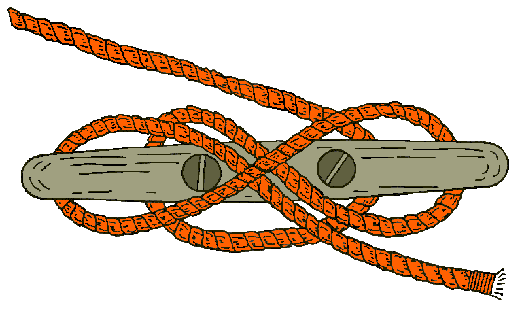
Cleat Hitch is used to secure a rope to a cleat. It is a simple hitch, yet seems to boggle the minds of many visitors trying to secure their lines to your cleat. It is the best way to tie a boat to a dock and is a quick and easy method of tying a rope to a cleat on a dock or boat that is also easy to untie. Learn the Cleat Hitch if you own a boat or even if you don’t. It is amazing how many boat owners do not know this easy and essential boating knot. This knot ties and unties quickly and neatly. You will impress everyone if you tie this knot when handed a rope at the dock!
- Take a turn around the base of the cleat, and then bring the line over the top of the cleat.
- Wrap the line back under the arm of the cleat opposite the first turn, then back over the top of the cleat.
- Wrap under the first arm a 2nd time and then back over the top of the cleat. You have now made a figure eight pattern over and around the cleat. Now form an under hand loop and slip that loop over the arm of the cleat, which pins the free end under the last wrap.
- Pull the free end tight and you have the neat, tidy and secure Cleat Hitch.
History of the Cleat Hitch
“Belaying a rope” means securing it or making it fast. Before cleats were common, a rope used to be secured to a vertical pin in a wooden beam called, of course, a “Belaying Pin”.
REFERENCE LINK
The post Cleat Hitch appeared first on Titan Paracord.


